

Perfect crackling, tender meat, luscious gravy, zero stress – my ultimate pork belly.
There are very few things in this world that make me as happy as pork crackling. Proper crackling – the bubbly, puffy, shatteringly crisp kind that snaps under your knife but doesn’t break a tooth. And pork belly? Don’t even get me started. I’ve been obsessed with finding a foolproof method for years … the kind that gives you soft, juicy, slow-cooked pork belly and perfect crackling, without complicated techniques or chef-level equipment.

I’ve tried every method under the sun. Scoring, poking, drying, rubbing, pressing, air frying, cross-hatching … you name it. And honestly? Most of those steps aren’t necessary. In fact, the biggest game-changer in my entire pork belly journey came from discovering something incredibly simple: don’t score the skin.
I first learned this tip from Nagi at RecipeTin, and it completely changed the way I cook pork belly. That one tip – stop cutting the skin – was revolutionary. For years I’d been scoring the pork myself, thinking it was the only way to get crackling. It turns out it’s actually one of the biggest reasons crackling fails. When pork is scored too deeply (and supermarket/butcher scoring is almost always too deep), moisture seeps through the cuts and you end up with those dreaded chewy patches. And once they’re chewy … that’s it. There’s no bringing them back.
This method eliminates that problem entirely. No scoring. No steam trapped under the skin. No chewy patches. Just a simple, reliable three-step process:
- Totally optional (but highly recommended!) dry-brining of the pork skin. This takes 6–24 hours, so you’d need to start the day before.
- To cook, start with a blast of high heat to begin puffing and drying the skin.
- Slow-roast the pork until the meat becomes meltingly soft, juicy and tender.
- Finish under the oven grill (broiler) for a couple of minutes to achieve that gorgeous, bubbly, glassy crackling.
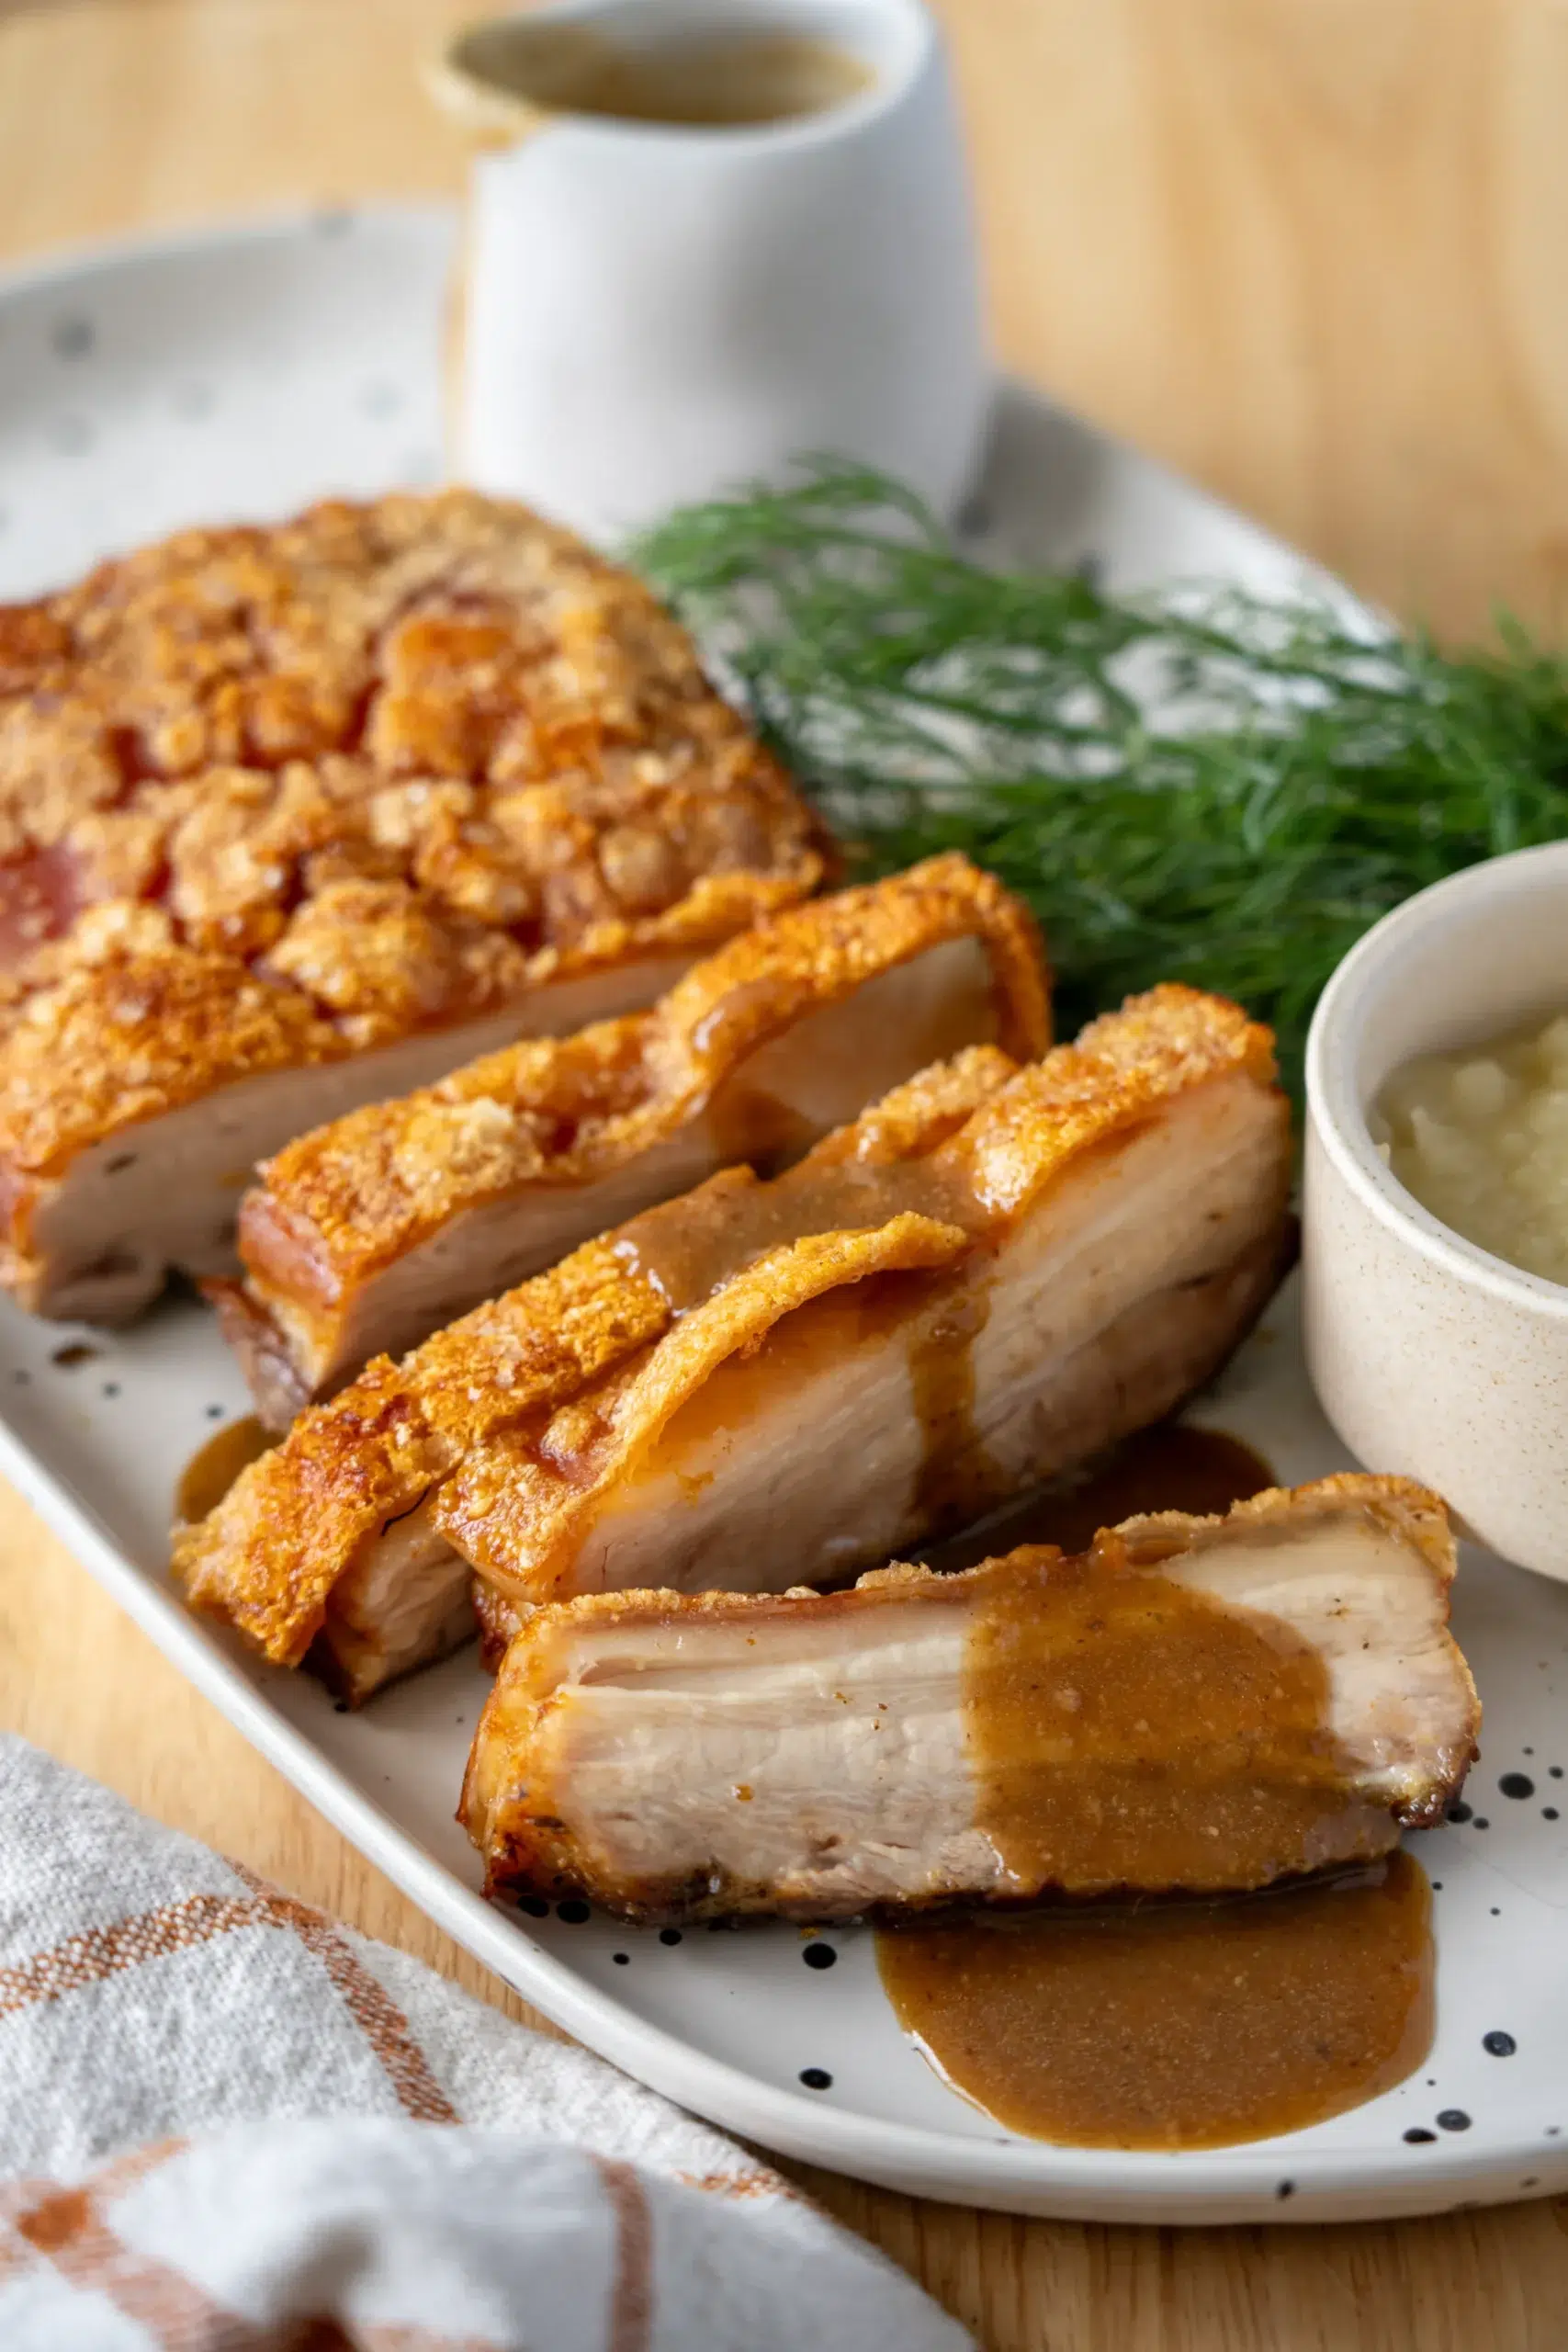
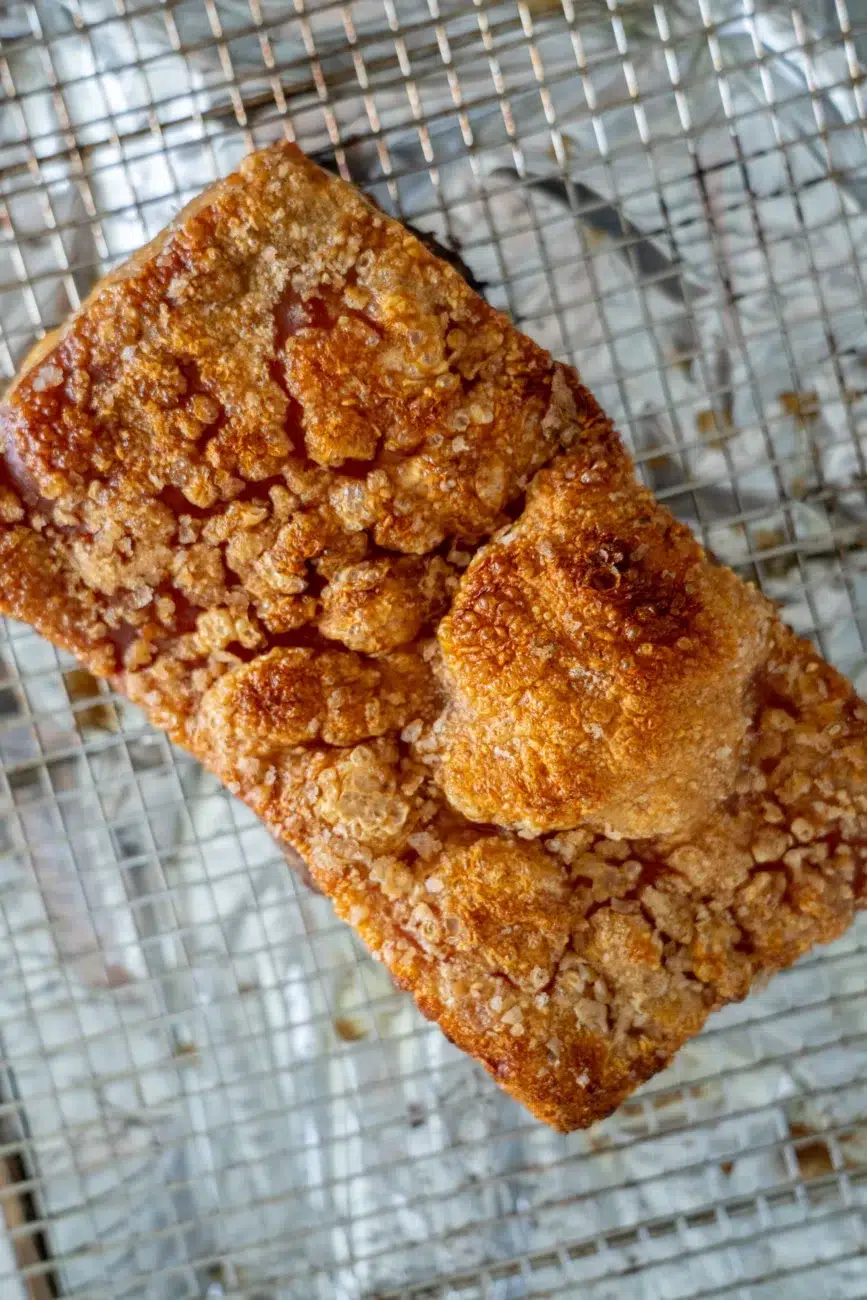
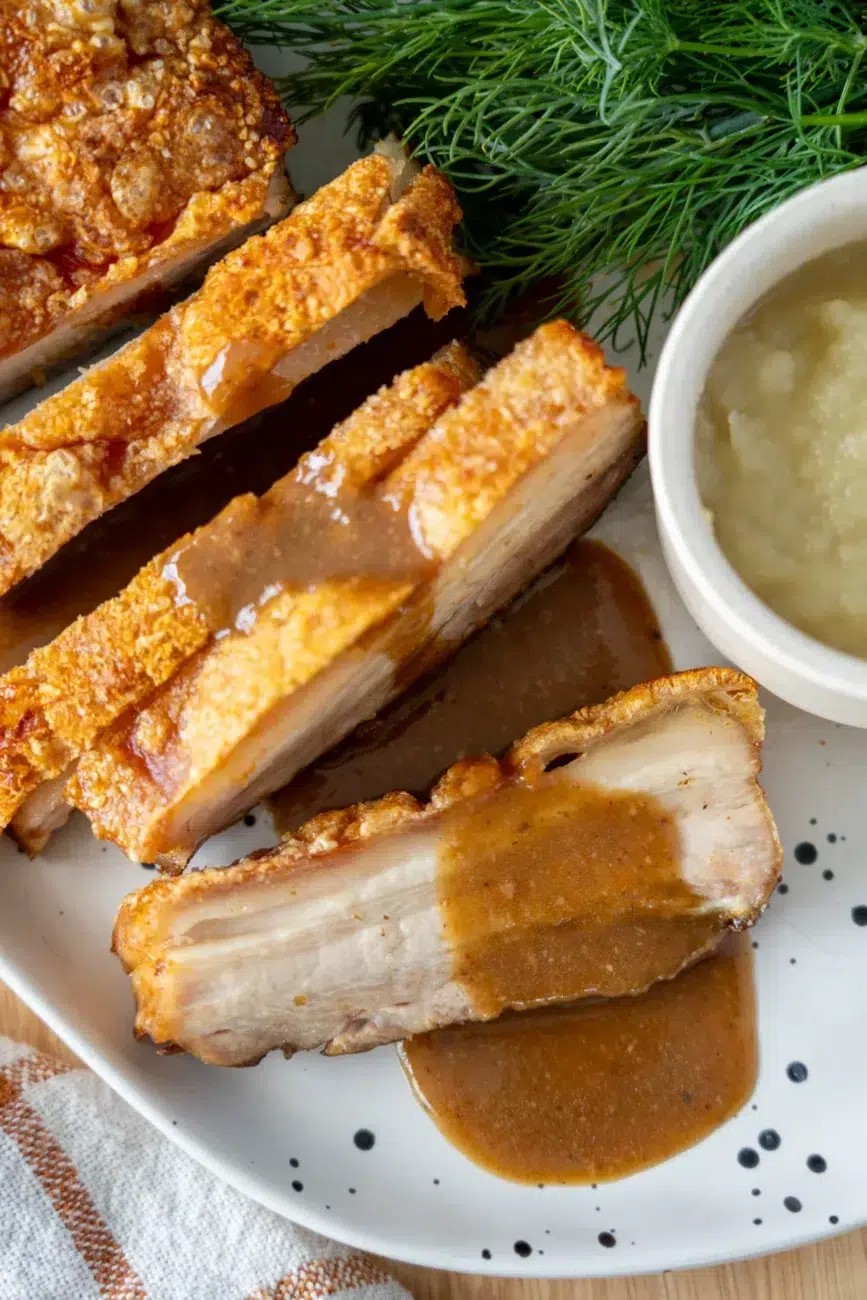
The result? The best crackling I’ve ever made at home – light, puffy, airy and ridiculously crisp – sitting on top of the softest pork belly. It’s the kind of crackling you can actually bite through. No jaw-dislocation required!
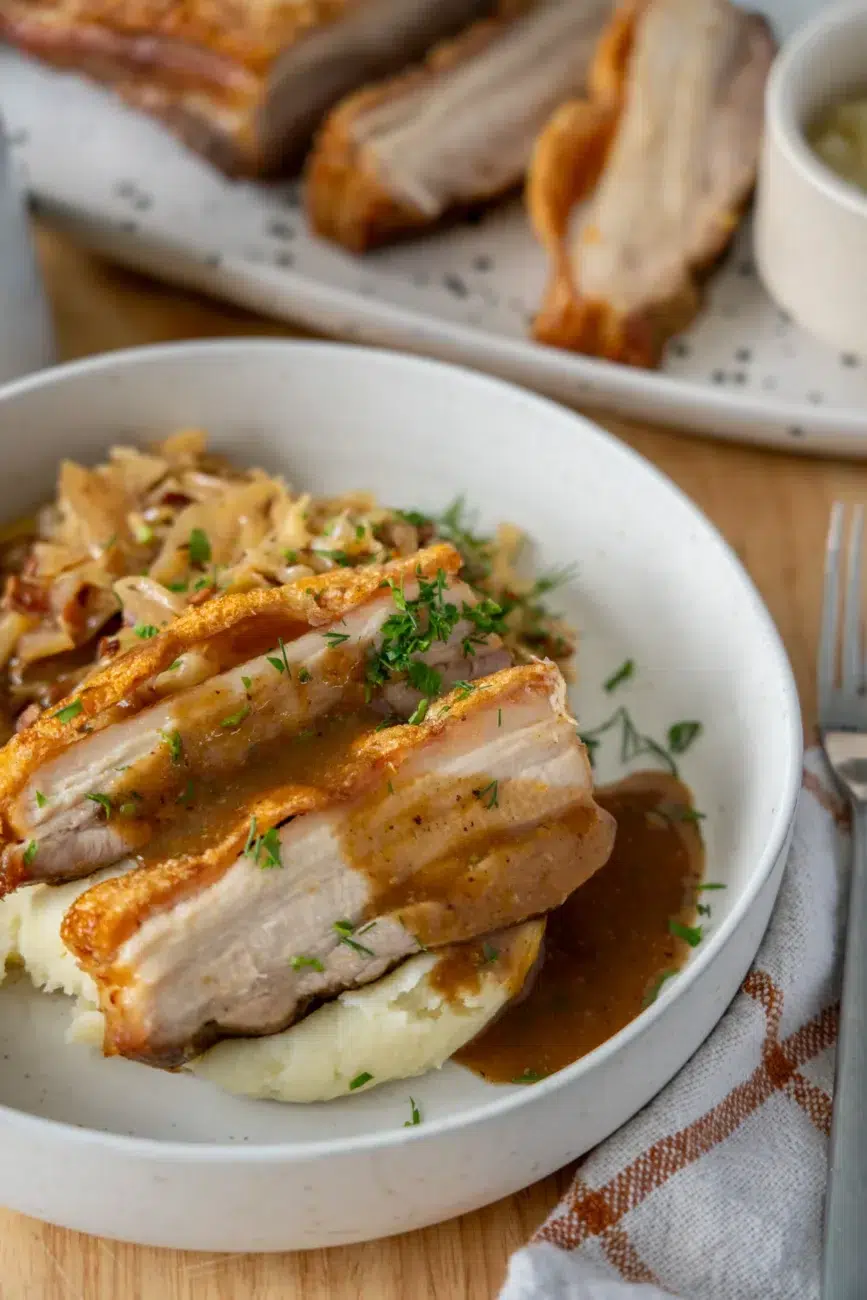
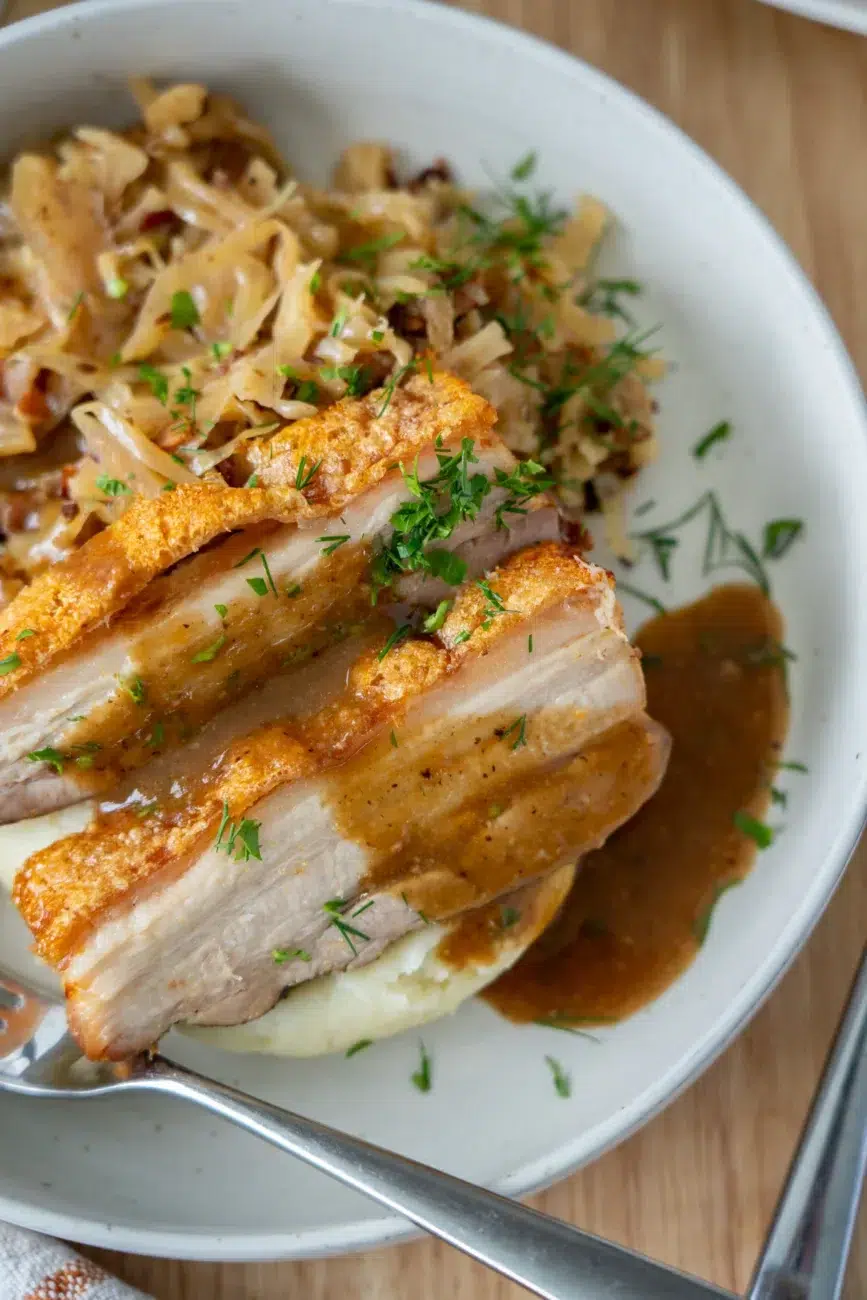
And of course … pork belly this good needs a proper gravy. That’s how my mum always served it when I was growing up, and I’ll never stray from that. I’m pairing this with a rich roasting-tray gravy, creamy mashed potatoes, German-style Braised Cabbage with Bacon, homemade apple sauce, and a sprinkle of fresh dill and parsley to brighten everything up. It’s wholesome, comforting and has that nostalgic European-inspired feel that takes me straight back to my childhood.
I wanted to share this recipe because pork belly can feel intimidating – especially when crackling is involved – but it really doesn’t need to be. This method is simple, reliable and incredibly forgiving. It’s the one I use when I’m entertaining because I know it won’t fail, and the recipe includes all my make-ahead instructions so you can prep it stress-free.
If you’ve ever wanted to master pork belly at home, this is your time. A foolproof method, minimal fuss, maximum payoff … and crackling that will make you feel like a genius.
How do I get perfect pork crackling every time?
Drying the skin is the biggest key. Leave the pork uncovered in the fridge for 6–24 hours, pat it dry before roasting, start with a hot oven, and don’t score the skin. Unscored skin dries evenly and puffs into that beautiful, airy crackling without any chewy patches. If you don’t have time to air-dry, don’t panic – you can still absolutely make this recipe. It will still produce crackling that everyone will rave about, it just won’t be as puffy as in the photos.


Why shouldn’t I score the pork belly skin?
Scored pork often leads to crackling failure. The cuts allow moisture to seep through to the skin, which creates soggy, chewy patches that never crisp up. When butchers pre-score pork, it’s almost always cut too deep, piercing the fat and flesh. Leaving the skin intact gives you the light, puffy, “glass-like” crackling this recipe is famous for.
Can I make this pork belly ahead of time?
Yes – and it’s one of the best meats for entertaining because it reheats beautifully. Cook the pork belly completely, refrigerate it (skin uncovered or loosely covered), then simply blast the crackling under the oven grill (broiler), or in the air fryer at 200°C (400°F), for 2–4 minutes before serving. The meat stays juicy and tender, and the crackling re-crisps perfectly.

What else can I serve with pork belly?
This recipe is paired with German-style Braised Cabbage with Bacon, mashed potatoes, homemade apple sauce and dill and parsley for freshness. But pork belly is incredibly versatile, so here are some more delicious options:
Potato sides
- Creamy potato salad (German-style is incredible)
- Roast potatoes
- Crispy smashed potatoes
- Hasselback potatoes
- Potato gratin
Fresh and crunchy
- Coleslaw
- Shaved fennel salad (toss thinly shaved fennel with lemon juice, olive oil, salt and pepper and optional parmesan shavings)
- Rocket (arugula) salad
- Pickled cucumber or sauerkraut (amazing with rich pork)
Vegetables
- Steamed broccolini (tenderstem broccoli)
- Roasted carrots
- Green beans with garlic
- Sauteed red cabbage
Anything fresh, tangy or crunchy works brilliantly with pork belly because it cuts through the richness.
What can I do with leftover pork belly?
Slice it and use it for:
- Bao buns with hoisin and cucumber
- Vietnamese banh mi
- Pork belly fried rice
- Tortilla wraps
- Loaded pork sandwiches
- Crispy pork belly salad bowls
Leftover crackling (if stored separately) can also be re-crisped in minutes, see the recipe notes for full details.
If you enjoyed Crispy Slow-cooked Pork Belly and Gravy, I think you’ll love:
Pork Chops with Homemade Gravy Recipe
Easy Oven-baked BBQ Pork Ribs Recipe
Slow-cooker Lamb Shoulder Recipe
Rosemary and Garlic Lamb Leg Recipe
Slow-cooked Sticky Pork Belly Recipe

Crispy Slow-cooked Pork Belly and Gravy
This Slow-cooked Crispy Pork Belly and Gravy recipe gives you melt-in-the-mouth tender meat and incredibly crispy, puffy crackling every single time – without scoring the skin or any complicated steps. Starting with high heat, then roasting low and slow, and finishing under the oven grill (broiler) makes this method completely foolproof, and the roasting tray gravy takes it over the top. Perfect for entertaining, Sunday roasts or Christmas Day, and surprisingly simple to prepare ahead.
- Total Time: 2 hours 50 minutes (excluding drying time)
- Yield: 4–6 servings 1x
Ingredients
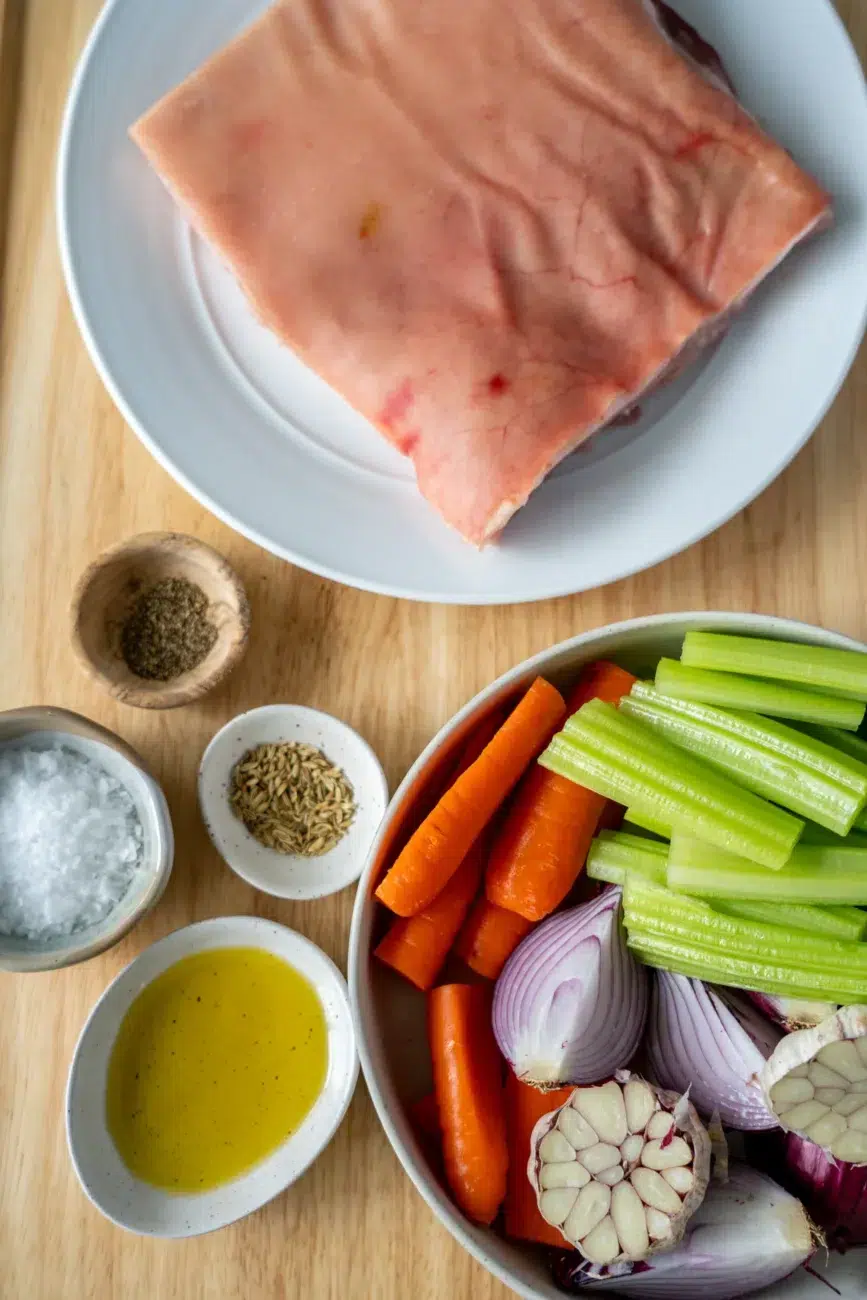
Pork
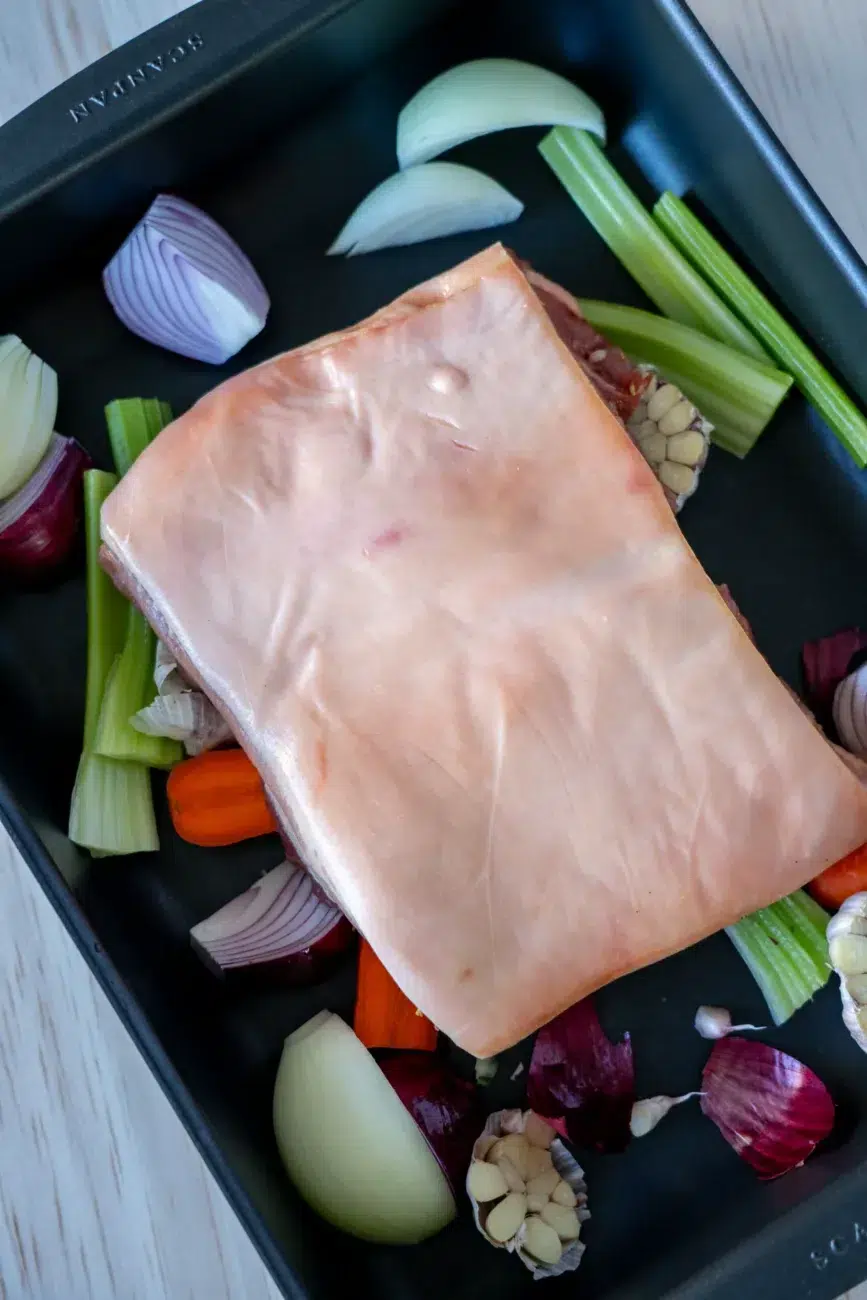
- 1 kg (2¼ lb) pork belly, skin on, not scored (see note 1)
- 1 tsp olive oil
- 1 tsp sea salt flakes
- 1 tsp ground fennel seeds (see note 2)
- ½ tsp freshly cracked black pepper
- 3 cups (750 ml) water (for roasting, see method)
Vegetable Base
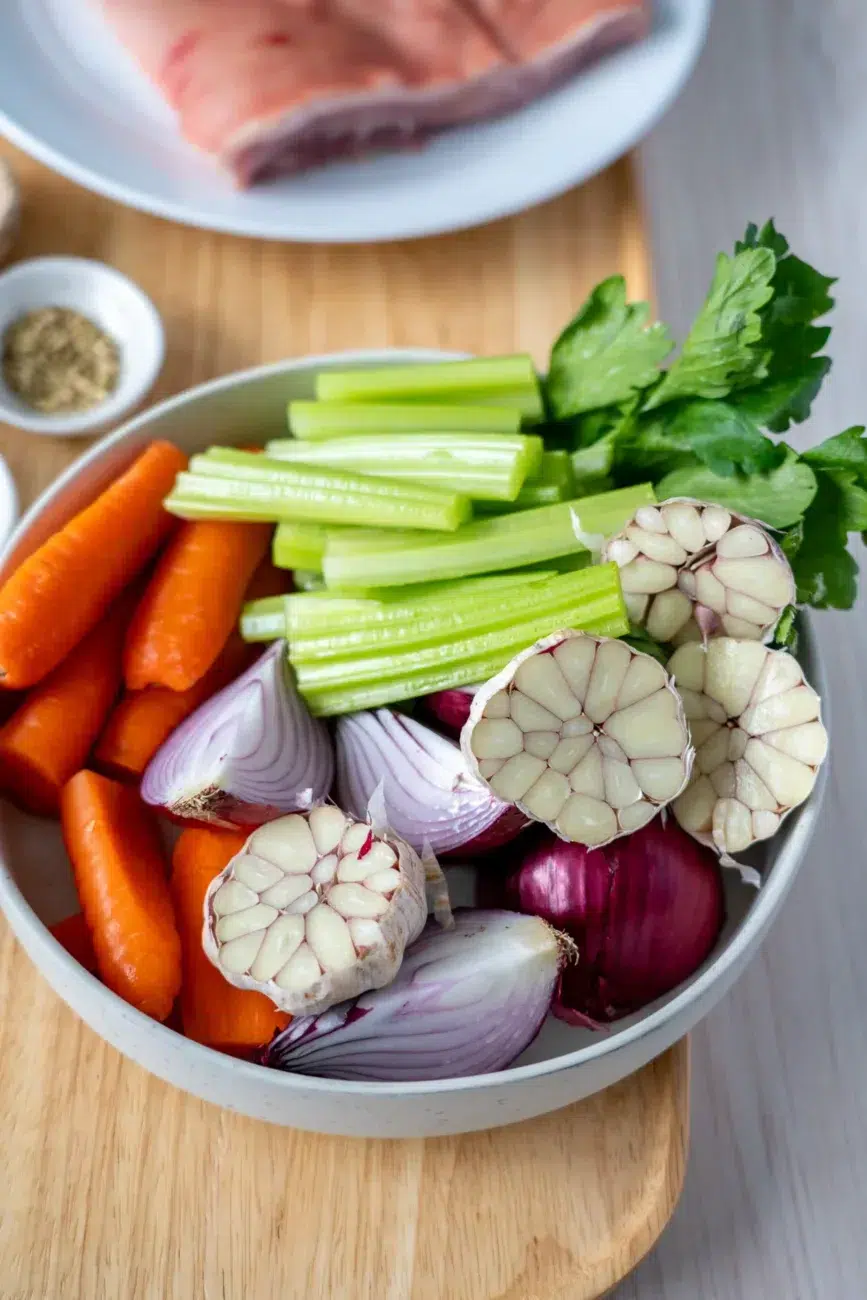
- 2 onions (any variety), unpeeled, cut into quarters
- 2 carrots, unpeeled, halved and cut lengthways
- 2 celery stalks, halved and cut lengthways
- 1 large garlic bulb (or two small), unpeeled, cut horizontally in half
Crackling
- 1 tsp olive oil
- 2–3 tsp sea salt flakes
Gravy
- ¼ cup (35 g) plain (all-purpose) flour
- 3 cups (750 ml) chicken stock
- Sea salt flakes, to taste
- Freshly cracked black pepper, to taste
Serving Suggestions
- Mashed potatoes
- German-style Braised Cabbage with Bacon
- Homemade apple sauce
- 1 tbsp each of finely chopped flat-leaf parsley and dill
Instructions
- Dry the skin overnight (optional but recommended) – Remove the pork from its packaging, place it on a plate or chopping board and pat the skin dry thoroughly with a paper towel. Place it in the fridge, uncovered, skin-side up, and leave for 6 hours (minimum) or up to 24 hours (best). If you don’t have time to air-dry, you can still make this recipe – it will still produce amazing crackling, just not quite as puffy as the photos.
- Preheat the oven – Preheat the oven to 240°C (475°F) (all oven types). It needs to be very hot, so don’t rush this step – most ovens need a good 20 minutes to heat properly.
- Prepare the pork rub – Remove the pork from the fridge 30 minutes before baking. Pat the skin dry again with a paper towel to remove any fresh moisture (even if you air-dried it overnight). Turn the pork over so it’s skin-side down. Drizzle the flesh (not the skin) with the olive oil and sprinkle with the salt, fennel seeds and pepper. Use your hands to coat the flesh of the pork (including the sides).
- Build the vegetable base – Arrange the onion, carrot, celery and garlic in a large, deep roasting pan. Place the pork, flesh-side down, on top of the vegetables. Use the vegetables to prop the pork up so that it sits as level as possible – this helps the crackling form evenly.
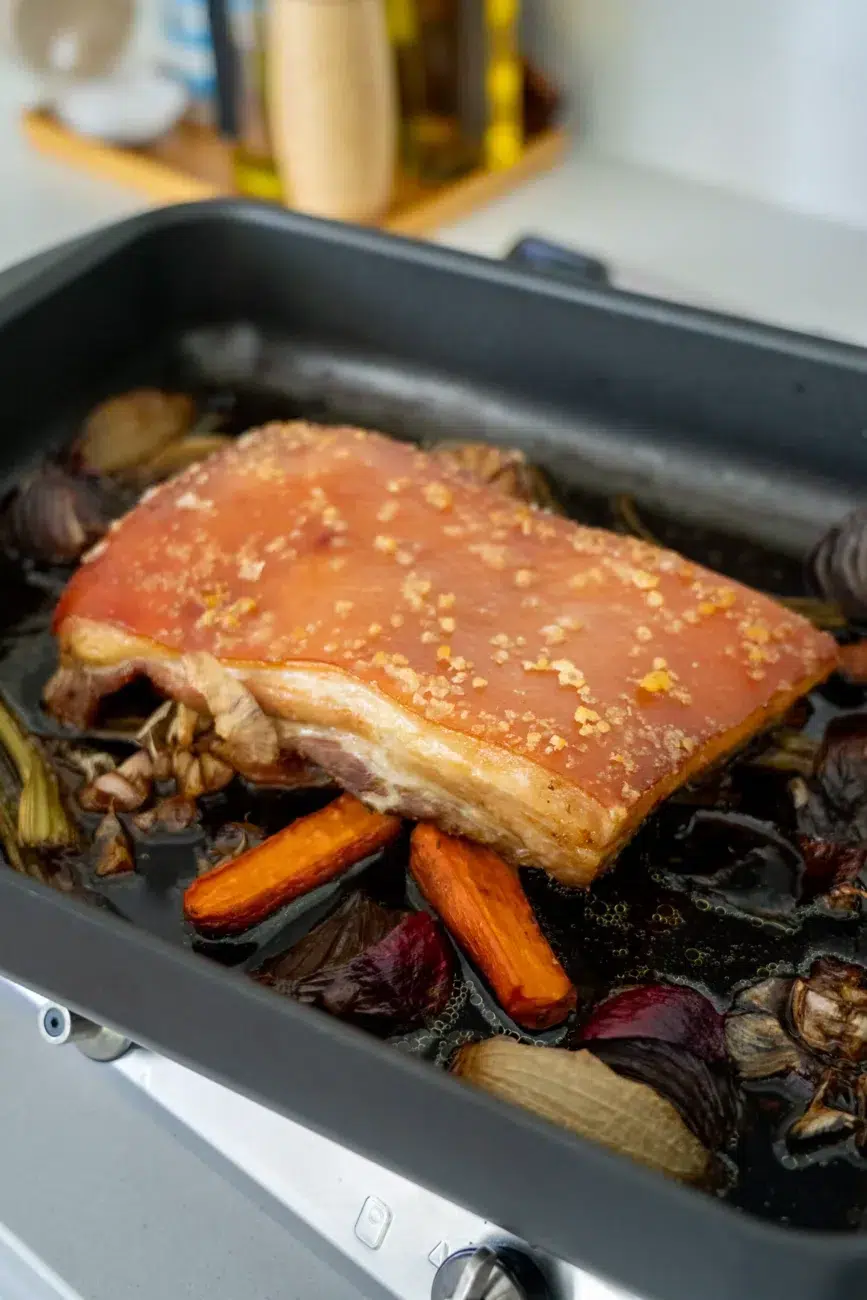
- Prepare the crackling – Pat the skin dry one more time. Rub the olive oil over the top of the skin so it’s lightly and evenly coated. Sprinkle the sea salt flakes evenly across the surface – this even layer of salt is key to crispy, puffy crackling. Don’t leave the pork sitting around with the salt on it; once salted, it needs to go straight into the oven.
- High-heat roast (to start the crackling) – Place the pan on the middle rack of the oven and roast for 30–40 minutes, or until the skin is starting to dry out and small bubbles begin forming. It will not be fully crackling at this stage – this step simply jump-starts the process and guarantees a great result later.
- Low and slow roast – Reduce the oven temperature to 160°C (325°F) (140°C/275°F fan-forced). Carefully pour 3 cups (750 ml) of water into the base of the pan (not over the pork – keep the skin dry). Roast for 2 hours, or until the pork is tender when pierced through the side with a knife – adding more water, ¼ cup (60 ml) at a time, if the tray looks like it’s drying out or if the vegetables start to catch.
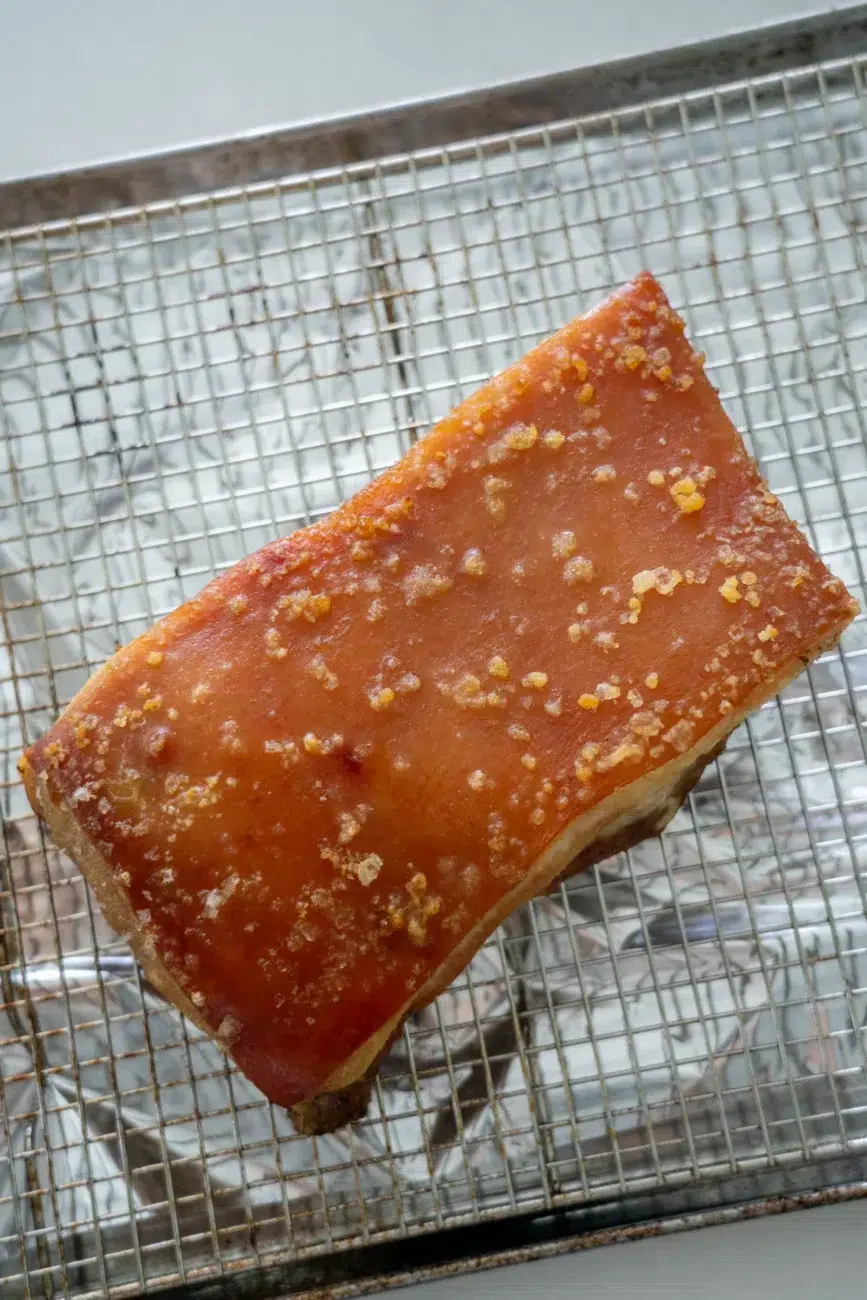
- Finish the crackling under the oven grill (broiler) – Remove the pork from the oven. Transfer the pork belly, skin-side up, to a foil-lined baking tray with a wire rack placed on top.
- Turn the oven grill to high – Place the pork on a high shelf and grill (broil) for 2–3 minutes, or until the skin puffs and turns golden. WATCH IT CLOSELY – crackling can go from perfect to burnt in seconds. If any spots are browning too quickly, cover them with a small piece of foil. Set the pork aside to rest for at least 15 minutes while you make the gravy.
- Make the gravy (the best part) – Place the original roasting pan (with the vegetables) on the stovetop over medium heat. If there is a lot of excess fat in the tray, ladle out all but 2 tablespoons. Sprinkle the flour over the vegetables and stir to form a thick paste. Slowly add the chicken stock, whisking as you go. Simmer for 2–3 minutes, scraping up all the golden, flavour-packed bits from the base of the tray.
- Finish the gravy – Pour the gravy through a sieve into a small saucepan, using the back of a spoon to press as much flavour out of the vegetables as possible. Season with salt and pepper to taste. Keep warm.
- Carve the pork belly – Place the pork belly on a clean chopping board, skin-side down (this prevents the crackling from shattering). Slice into thick pieces (about 1.5 cm/½ inch) and serve with mashed potatoes, braised cabbage, apple sauce, gravy and a sprinkle of finely chopped dill and parsley.
Notes
Note 1 – Why I recommend unscored pork belly Leaving the skin intact gives you the best crackling. When pork is pre-scored (especially supermarket cuts), the knife almost always goes too deep and pierces the fat or flesh. This allows moisture to rise through the cuts during cooking, creating soggy patches that never crisp up. If scored pork is all you can get, don’t stress – the recipe still works – but unscored will give you those beautiful, even “bubbly” crackling patches like the photos.
Note 2 – About the fennel Fennel and pork are a classic pairing. The fennel seeds give the pork a subtle, aromatic flavour without tasting “herby”. I use ground fennel seeds, but you can also lightly crush whole seeds with a rolling pin. If you’re not a fennel fan, simply leave it out – the crackling will still be perfect.
Make Ahead
Pork belly is one of my favourite meats to prepare ahead because it reheats beautifully and the crackling can be brought back to life in just a couple of minutes. Here’s exactly how to do it so you get perfect results on the day.
Pork belly (whole piece) – best option for entertaining or Christmas Day
- Cook the pork belly completely as per the recipe – including the initial high heat, the slow roast, and the final crackling step under the grill (broiler).
- Cool it properly – Let it sit at room temperature for about 1 hour so the steam escapes – this stops the skin from getting soggy.
- Refrigerate –
- Place the whole pork belly, skin-side up, on a tray or plate.
- Refrigerate uncovered or lightly tented with foil (never sealed tightly), for up to 2 days.
- The crackling will soften in the fridge – totally normal. We can bring it back in minutes.
- Reheat on the day –
- Remove from the fridge 20–30 minutes before reheating.
- Warm the meat in a 180°C (350°F) (160°C/325°F fan-forced) oven for 15–20 minutes, loosely covered with foil.
- Remove the foil, switch the oven grill (broiler) to high, and grill (broil) for 2–4 minutes until the crackling puffs and crisps again.
- Watch closely as it can go from golden to burnt quickly!
Pork belly (sliced with crackling stored separately) – great for individual plating or when fridge space is tight
- Cook the pork belly completely as per the recipe – including the initial high heat, the slow roast, and the final crackling step under the grill (broiler).
- Separate the crackling (optional but ideal for the crispiest finish).
- Allow to cool slightly (20–30 minutes), then slice into pieces.
- Store the meat and crackling separately:
- Meat – Airtight container, up to 3 days.
- Crackling – Refrigerate for up to 3 days in a container lined with paper towel, with the lid ajar so moisture doesn’t soften it.
- Reheat:
- Meat – Oven (180°C/350°F, 160°C/325°F fan-forced) for 10–15 minutes (covered with foil).
- Crackling – Place on a baking tray and cook under the oven grill (broiler) on high heat, or air fry at 200°C (400°F) for 2–4 minutes until puffy again. Watch it closely so it doesn’t burn!
Gravy
You can prep the gravy in advance.
- Make the gravy as per the recipe on cooking day.
- Cool completely, then store in an airtight container in the fridge for up to 3 days.
- On serving day, gently reheat on the stovetop.
- If it thickens (it will!), whisk in a splash of water until it is smooth again.
You can also freeze the gravy for up to 2 months. Thaw overnight and reheat gently, whisking until silky.
Leftovers
Leftover pork belly is absolutely delicious the next day and reheats beautifully if stored correctly.
Refrigerating
- Pork belly meat – Store slices in an airtight container in the fridge for up to 3 days.
- Crackling – For the crispiest results, store it separately from the meat. Refrigerate the crackling for up to 3 days in a container lined with paper towel and keep the lid loose or ajar so it stays dry.
- Gravy – Store in an airtight container in the fridge for up to 3 days. It will thicken as it chills.
Freezing
- Pork belly meat – Freeze pork belly slices (without the crackling) for up to 2 months. Thaw overnight in the fridge before reheating. Crackling is not suitable to freeze.
- Gravy – Can be frozen for up to 2 months in an airtight container. Thaw overnight and whisk while reheating gently on the stovetop or in short bursts in the microwave.
Reheating leftovers
Reheat the pork belly meat the same way you would in the Make Ahead section:
- Oven (best) – 180°C (350°F) (160°C/325°F fan-forced), covered with foil, 10–15 minutes.
- Microwave (fast option) – Meat only (don’t try and microwave the crackling as it will soften).
- Crackling – Re-crisp in the air fryer at 200°C (400°F) or under the oven grill (broiler) on high for 2–4 minutes until bubbly (microwaving will soften).
Leftover ideas
Turn leftovers into easy next-day meals like bao buns, fried rice, wraps, noodle bowls, sandwiches, banh mi or crispy salad bowls. Pork belly is incredibly versatile and tastes just as good the next day.
- Prep Time: 10 minutes (plus optional 6–24 hours drying time)
- Cook Time: 2 hours 40 minutes
- Category: Pork, Slow-cooked, Family Favourites, Easy Entertaining, Christmas
- Method: Oven
- Cuisine: German-inspired